
Showing posts with label diy. Show all posts
Showing posts with label diy. Show all posts
DIY Favors: Paper Cake Slice
We saw this posted on the How About Orange blog and loved this idea as a DIY project for wedding favors. The paper cake slice is so adorable and perfect to fill with whatever candy or favor you want! It is a great unique detail to add to any wedding. You can even use different color paper to make different "flavored" cakes!
 Find the simple instructions at Paper Source Blog.
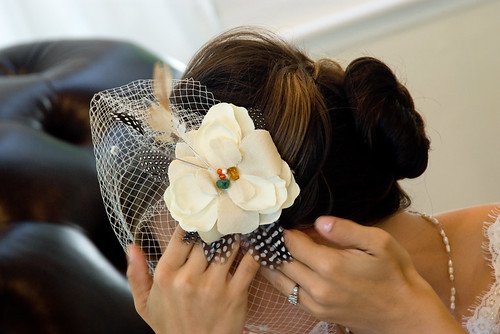
Reader Question: The Fascinator
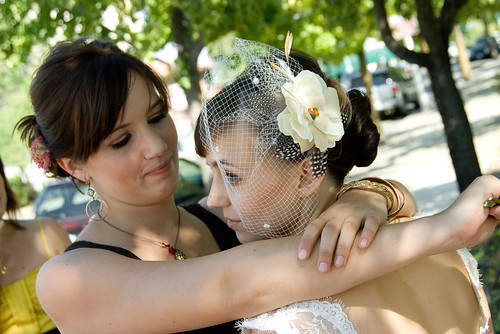
Reader Question: My question for you is specifically about your fascinator flower and veil. I love it! I'd seen and saved the image months ago but could never find where it was from. Did you make it/buy it? Do you have any advice about how I could make or buy the same?
---------
I made my fascinator and intended to do a tutorial ages ago, but after attempts to make fascinators for a few friends I realized I couldn't recreate what I did well enough to feel comfortable sharing my methods. But, with the help of a few other tutorials, I'm going to do a quick write up of what I did here.
To start with, this tutorial seems pretty good, as does this one. If what I'm writing makes no sense, maybe try one of those?
Both are similar to what I did, in that i started with a felt base (mine was two layers glued together). I then glued my first layer of feathers down and waited for them to dry, then my second layer of feathers and let them dry.
For the flower I took apart a fake flower I liked the shape of and used it as a template to cut out new "petals" from raw silk I owned (you could just use a pre-made flower, but I liked the color/texture of the silk I had). I sewed and used a tiny bit of glue to attach the longer feathers to the center of the flower, and then sewed the stones I used (they were actually stone beads) through the center of the petals to stick them all together. I wrapped ribbon around the top of a hair comb and sewed that to the felt on the bottom of the fascinator.
I did base my fascinator design on the ones made by k. autumn, so she'd be a good place to start if all of this looks totally overwhelming. One of my friends had a k. autumn fascinator and loved it. I will say it might be worth trying to do it yourself first if you are on a budget. I spent a total of about $15 making mine, and I know the pre-made ones run at least $100. Hope that helps!
DIY - Special Order Cardstock

We can special order cardstock, vellum and paper in the following sizes: 8 1/2 x 11, 12x12 and 11 x17 for anyone who is wanting to DIY their own wedding invitations. Follow the links below for color swatches - then call or email us for pricing! You can also call or stop in to see sample swatches in person.
We also have access to hundreds of special order envelopes in many sizes, colors and finishes - Envelope Swatches
This would make an adorable wedding dress


#680: the paper crafties.
i love crafting.
but i'm not the type who can REALLY craft. i mean. i love the people who can REALLY craft. like, the serious crafters out there who can REALLY create REALLY amazing stuff.
but i'm not one of those.
i'm more of a... wannabe crafter. you know. the kind of crafter that gets an a for effort.
that kind of thing.
but i guess i didn't care. because we still ended up with sort of a paper craft extravaganza...thing.
our card box and our programs:

uh huh. that's right. paper baggies for the pompoms:

our centerpieces:

part of our placecard table:

here are our placecards, appropriately blurrily photographed by a friend:

(remember way back when when they were just frosh? sigh.)
most of them ended up finding cozy homes as such (photographed by a friend):

the paper experience worked for us because...well, i love paper. and i love to craft. craft-extraordinaire-WANNABE i may be, but those jitters came second to just doing something i really enjoyed doing...so that the end result would be a personal, connected, and meaningful one.
which it was.
and that's the a's and z's of it, yo. simple, huh.
all photos by max wanger unless i said it wasn't.
#676: the flowers. and kismet.
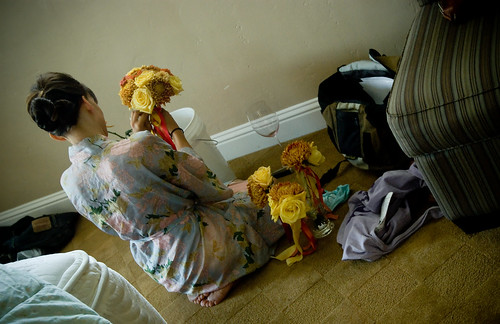
we used real flowers for only a few things: my bouquet, the bms' bouquets, 3 orchid bouts for our moms and my grandmother, and two flower bundles to present to the parents.
total cost: $50.
so very nice.
my plan all along had been to stop by the whole foods behind my house the night before the wedding and just buy the flowers they had available there.
but a couple of weeks before the wedding, i found out that the flower mart was literally two blocks from where i worked. i always knew it was close, but having never been, i had no idea it was THAT close. so i walked myself over during lunch one day to check it out and promptly scrapped the whole foods idea. it'd be so silly to go retail when the wholesale route was staring at me in the face.
the day before the wedding, the hubs and i went to the mart to select and purchase our wedding flowers. and we had 1.5 hours to do it.
i didn't have any colors in mind or the names of the types of flowers i wanted to use for our bouquets. and no pictures of inspiration with me. instead, i was hoping really really hard to be inspired by whatever was there that day. (flexibility is cool like that.)
we weren't walking around for more than a few minutes when i came to a place that had an assortment of peonies. light pink peonies, bright pink peonies, and lavender-pink peonies. they were all blooming differently and i thought they were amazing looking. so i began to look through the bunches to pick the best ones. of course.
when all of a sudden, the owner was like "hey!"
turns out, the shop owner was my dad's friend. someone i hadn't seen in over ten years. i was like WHAT?! and he wouldn't take more than $50 from us for the 10 bunches or so that we bought. and then he threw in 3 orchid bouts for the moms and grandma for free. i was like WHAT?! but there was no saying no. and so we graciously said thank you and left the flower mart feeling uberly lucky and happy.
sometimes, when it's meant to be, it's just meant to be i guess.

the bouquets look pretty homemade, huh. my bms and i wrapped them up the night before the wedding with flower tape and some ribbon i had laying around at home. i will never know how florists make the bottom of bouquets so perfectly round and lavishly thick. mine was far from round. and way far from thick.

see what i mean? the bottom was all jaggedy and triangular.
but i don't know. i still loved the way our bouquets looked. the light pink color matched my bms' dresses quite well (my sister, the MOH, in the jeweled green/blue above. one of my bridesmaids in coral below.) and, well, i wore white, so anything would've worked. but the slightly darker lavender pink color was nice.


oh, and then here's one of the two bundles i made with the bright pink peonies for our parents. wrapped with a cut up ralph's paper shopping bag.

all pinks. all peonies. all DIY.
who knew.
all photos by max wanger. some given an extra crop by me.
DIY: Sparkler Cards and Matchbook Wrappers


This is a great project for those who are using sparklers at your wedding!
Please visit Twig and Thistle for instructions!!
Reader Question: Wedding Day Timeline
Reader Question: I was wondering if you could post a timeline of the days leading up to the wedding. I am especially in search of one for the wedding day.
I'll have to work on a lead-up to the wedding timeline (I have one, but I want to fiddle with it a bit so it more accurately depicts what actually happened). So, for now, here is our wedding day timeline (including stuff other people were doing and stuff we (P and me) were doing). I've given the timeline that we thought we'd go by and made a note if that thing actually ended up happening at a later time.
 11:00 am Prep salads & apps - Mom and assorted friends and family at the house
12:00 pm Men get ready for pictures at the house - Groomsmen plus P
 1:o0 pm Meet for pictures at the B&B (Wedding party plus us)


6:45 pm Buffet starts (Actually ended up starting around 7:15 pm)
I'll have to work on a lead-up to the wedding timeline (I have one, but I want to fiddle with it a bit so it more accurately depicts what actually happened). So, for now, here is our wedding day timeline (including stuff other people were doing and stuff we (P and me) were doing). I've given the timeline that we thought we'd go by and made a note if that thing actually ended up happening at a later time.
An Illustrated Wedding Day Timeline
8:00 am - Breakfast at the B&B (Wedding party plus P & me)
9:30 am Meet at house to continue set up -Menfolk, plus my parents and some assorted family
9:30 am Women at B&B for hair, getting ready, finishing up flowers w/photographer (we had our hair person come to us, which was just as cheap as us going there because she didn't have to pay for her stall rental).
11:00 am Prep salads & apps - Mom and assorted friends and family at the house12:00 pm Men get ready for pictures at the house - Groomsmen plus P
1:o0 pm Meet for pictures at the B&B (Wedding party plus us) 3:30 pm Back to house for family pictures - Us, wedding party, family
4:15 pm Set up apps & drinks in backyard and water in front - Designated friend helpers
4:30 pm People arrive, greet people - Everyone
4:15 pm Set up apps & drinks in backyard and water in front - Designated friend helpers
4:30 pm People arrive, greet people - Everyone
5:00 pm Ceremony starts - We based this on when we thought it would start cooling down.
6:00 pm Drinks, apps, and fun
6:45 pm Buffet starts (Actually ended up starting around 7:15 pm)
7:30 pm Cut pie (Dinner actually ended up taking longer than we thought so this actually happened around 8:30)
7:30 pm Dancing music (Actually ended up starting a bit after 8:30--immediately after cake/pie).
We wrapped up just around midnight, though most folks were gone by then and it was mostly the people were were spending the night there after about eleven or so.
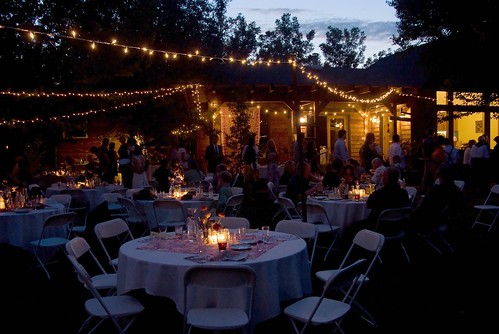
#664: light it up.
any excuse to have a party. or to buy a house with a backyard.

so gorgeous. instructions via once wed.

so gorgeous. instructions via once wed.
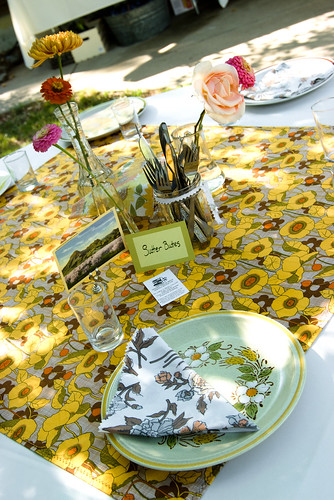
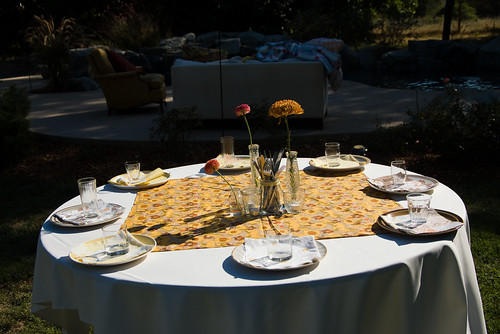
Doing dishes
My favorite bit of wedding planning was spending weekends gathering the mismatched dishes we used for our dinner and dessert. I won't say it wasn't a ton of work, we literally spent almost a year of weekends working on it, but since Paul and I both love going thrift store and garage sale shopping, it was worth the extra effort for us.
 Since we were inviting 130 or so people to the wedding, we collected enough dishes for roughly that many folks. That meant 130 dinner plates, 200 or so small plates for dessert and appetizers (we figured not everyone would take their own plate), 130 dinner forks, dessert forks, and knives, some spoons for sugar & coffee stirring, 100 or so coffee cups, and around 250 glasses for water and wine. Crazy!
Collecting the Dishes
We probably could have collected the dishes faster but we had a few rules for ourselves.
First, while we originally wanted just china, after realizing the limitations of that, we expanded our search to dishes that primarily included white, brown, green, and yellow in their patterns. We wanted things that looked vintage, so we mostly avoided things that looked like they'd been created in the last few years.
 Second, we rarely bought something that cost more than it would have cost to rent that dish. So that generally meant buying things on sale. Luckily our local thrift stores have frequent sales and color tag 50% of sales daily, so we were able to do this without too much problem. If you are just doing this for aesthetic reasons, you could probably pick up your dishes much faster than if you are also doing it to help your budget. We did sell most of our dishes after the wedding so we made up some of the money that way as well.
 Third, we tried to get some of the dishes on Freecycle (for free). That meant driving around town picking things up. Again, if you aren't concerned about cost, you could eliminate this and save time.
Before the wedding, we had to wash all of the dishes. This took two full days. At home, we soaked all of the dishes in big tubs on our lawn. Neighbors thought we were insane hosing off dishes on our lawn, but we found that the sooner we got the price tag stickers off the dishes, the easier it was and our kitchen was too small to unload that many dishes.

 Of course you can't really get dishes clean on the lawn, so after a quick rinse and removing the sticker, we would box them up. We drove all the boxes up to my parent's house (where the wedding was held) and a few weeks before the wedding we spent almost a full day running them all through their dish washer before separating them into boxes for each table. You can see pictures of the boxes piled high on the post I wrote about it.
One of the challenges of using mismatched dishes is how to actually use them at the wedding. While I've seen people use one pattern at each table, we decided to mix it up more than that. But we found that it looked not as good (to us) to use both china and stoneware on one table. So we stuck with mismatched china on certain tables and mismatched stoneware on others.
 I actually handpicked the specific dishes for each table based on who would be sitting there. Again, crazy.
Since we were inviting 130 or so people to the wedding, we collected enough dishes for roughly that many folks. That meant 130 dinner plates, 200 or so small plates for dessert and appetizers (we figured not everyone would take their own plate), 130 dinner forks, dessert forks, and knives, some spoons for sugar & coffee stirring, 100 or so coffee cups, and around 250 glasses for water and wine. Crazy!Collecting the Dishes
First, while we originally wanted just china, after realizing the limitations of that, we expanded our search to dishes that primarily included white, brown, green, and yellow in their patterns. We wanted things that looked vintage, so we mostly avoided things that looked like they'd been created in the last few years.
Second, we rarely bought something that cost more than it would have cost to rent that dish. So that generally meant buying things on sale. Luckily our local thrift stores have frequent sales and color tag 50% of sales daily, so we were able to do this without too much problem. If you are just doing this for aesthetic reasons, you could probably pick up your dishes much faster than if you are also doing it to help your budget. We did sell most of our dishes after the wedding so we made up some of the money that way as well.Third, we tried to get some of the dishes on Freecycle (for free). That meant driving around town picking things up. Again, if you aren't concerned about cost, you could eliminate this and save time.Preparing the Dishes for the Wedding
Before the wedding, we had to wash all of the dishes. This took two full days. At home, we soaked all of the dishes in big tubs on our lawn. Neighbors thought we were insane hosing off dishes on our lawn, but we found that the sooner we got the price tag stickers off the dishes, the easier it was and our kitchen was too small to unload that many dishes.
Of course you can't really get dishes clean on the lawn, so after a quick rinse and removing the sticker, we would box them up. We drove all the boxes up to my parent's house (where the wedding was held) and a few weeks before the wedding we spent almost a full day running them all through their dish washer before separating them into boxes for each table. You can see pictures of the boxes piled high on the post I wrote about it.Setting up Mismatched Dishes
One of the challenges of using mismatched dishes is how to actually use them at the wedding. While I've seen people use one pattern at each table, we decided to mix it up more than that. But we found that it looked not as good (to us) to use both china and stoneware on one table. So we stuck with mismatched china on certain tables and mismatched stoneware on others.
I actually handpicked the specific dishes for each table based on who would be sitting there. Again, crazy.Cleaning Up
Edit to Add: After people ate we had a few wood crates (purchased for cheap from JoAnn's Fabric), set out next to the trash cans. A few people were in the know about this ahead of time and set the tone for others to do the same. Some people left their dishes on the tables, which we just picked up the next morning during clean-up.
One of the hardest parts of doing your own dishes is that you actually have to do your own dishes after the wedding. We could have hired someone to do it, but we decided to take matters into our own hands. So on Sunday, after most people had left, we spent the afternoon rinsing off all the dishes, throwing out the broken ones, and sorting them into piles (garage sale, keep, give to friends). Honestly, we didn't wash them that well. We basically rinsed in soapy water, hosed off (yup, the hose again), and dried them in the sun.
We actually use the dishes from our wedding as our house dishes now (and we have some of our favorites of the china saved for dinner parties). It's kind of a nice, daily reminder of the wedding.
And one final note...If we had to do it over we'd rent the silverware. There are 20 knives at every thrift store for every 1 fork. And thrift store silverware isn't cheap and is often kind of gross. Also, some thrift stores package the silverware so you are forced to buy a big bag of knives to get three or four forks. Annoying!
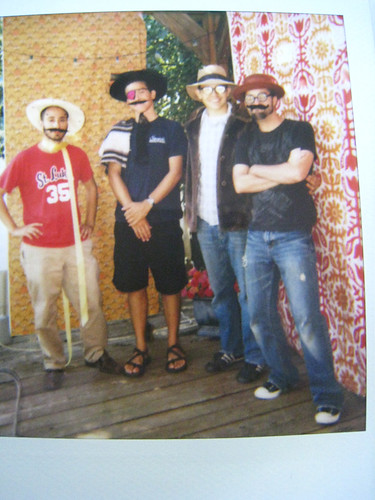
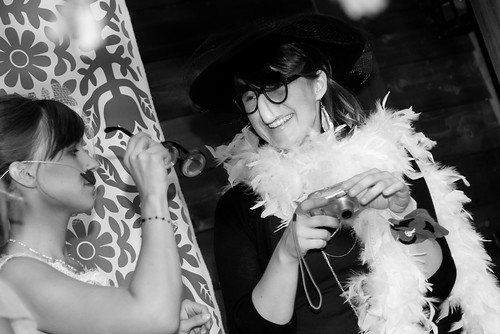
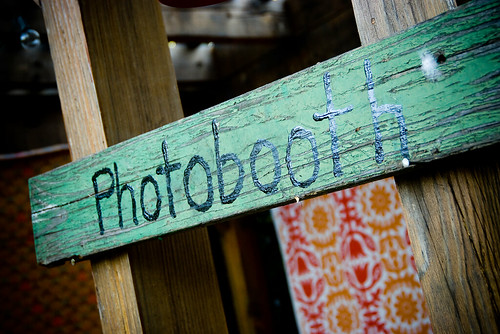
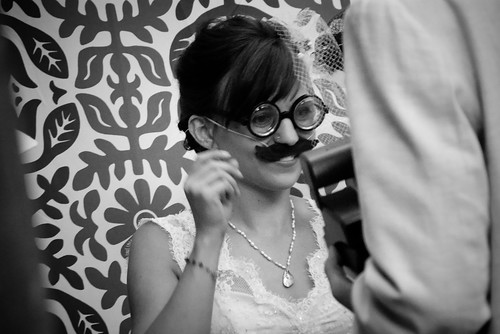
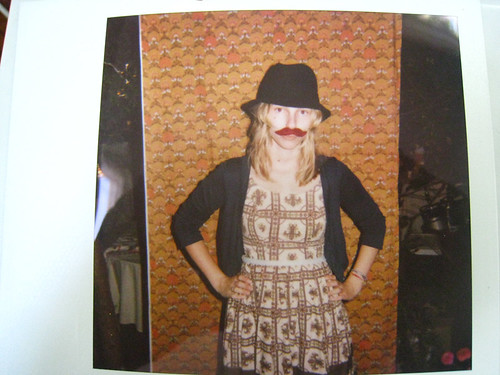
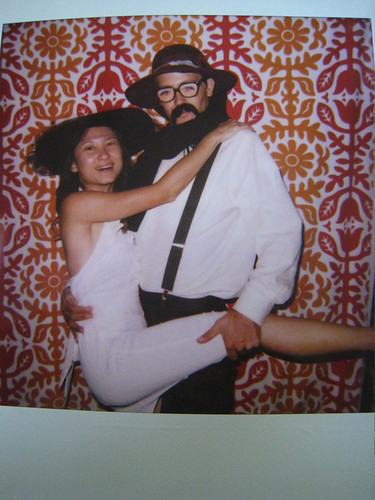
DIY: Polaroid Photobooth
Like many who have come before us, we really wanted a photobooth at our wedding. But, the cost of renting a "real" booth was far too high, so we went diy.
 We wanted people to take pictures for us to keep, but also be able to take some home, so we decided to go the Polaroid route. We already had the camera (we found it by the side of the road, in a junk pile, right after we started dating).
 Of course this came right around when they decided to take the film off the market, so the price of Polaroid film shot way up. We bought some of the film before the crisis, but we ended up scavenging eBay for most of it. All in all I believe we purchased around 200 shots worth of film for 100 people (we didn't use all of it). I've also heard that Fuji is now making Polaroid 600 film, so that should make it easier for those of you who want to try this.
 While some people have a designated picture taker, we knew our friends would be all over taking Polaroids so we figured they could switch off being picture taker and model. That worked out just fine and the booth was literally full all day while people were setting up, all night, and into the next day as we were cleaning up!
To make the backdrop for the photobooth we purchased two sheets of fabric (three yards of each). One was a regular sized fabric, and the other was upholstery fabric from Ikea. I'd recommend upholstery fabric because the heavier weight hangs better and the extended width allows more people to stand in front of it.
 To our advantage, we were able to just tack our fabric to my parent's deck and use their porch lights to light it. You could also make a wood frame to attach the fabric to, hang a line from trees and attach the fabric to that, or nail it to a wall.
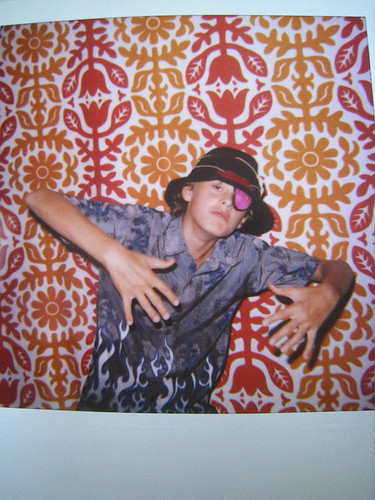 On the deck we put a table with the film, a board for people to post pictures on, and several costume items. For the costumes we used things I had lying around my house, plus a few purchased pairs of crazy $1 glasses. And yes, I have hats and fur coats and eye patches just lying around. The felt mustaches I made.
 And of course, as some of these pictures exhibit, our photographer couldn't help but snap a few pictures of people using the booth as well. They loved it!

We wanted people to take pictures for us to keep, but also be able to take some home, so we decided to go the Polaroid route. We already had the camera (we found it by the side of the road, in a junk pile, right after we started dating).Of course this came right around when they decided to take the film off the market, so the price of Polaroid film shot way up. We bought some of the film before the crisis, but we ended up scavenging eBay for most of it. All in all I believe we purchased around 200 shots worth of film for 100 people (we didn't use all of it). I've also heard that Fuji is now making Polaroid 600 film, so that should make it easier for those of you who want to try this.While some people have a designated picture taker, we knew our friends would be all over taking Polaroids so we figured they could switch off being picture taker and model. That worked out just fine and the booth was literally full all day while people were setting up, all night, and into the next day as we were cleaning up!To make the backdrop for the photobooth we purchased two sheets of fabric (three yards of each). One was a regular sized fabric, and the other was upholstery fabric from Ikea. I'd recommend upholstery fabric because the heavier weight hangs better and the extended width allows more people to stand in front of it.To our advantage, we were able to just tack our fabric to my parent's deck and use their porch lights to light it. You could also make a wood frame to attach the fabric to, hang a line from trees and attach the fabric to that, or nail it to a wall.On the deck we put a table with the film, a board for people to post pictures on, and several costume items. For the costumes we used things I had lying around my house, plus a few purchased pairs of crazy $1 glasses. And yes, I have hats and fur coats and eye patches just lying around. The felt mustaches I made. And of course, as some of these pictures exhibit, our photographer couldn't help but snap a few pictures of people using the booth as well. They loved it!
DIY: Gocco Invitations
How did I not write about our invitations? Perhaps I blocked them out because they were so. much work. After they left my house I was happy to have them out of sight, out of mind.
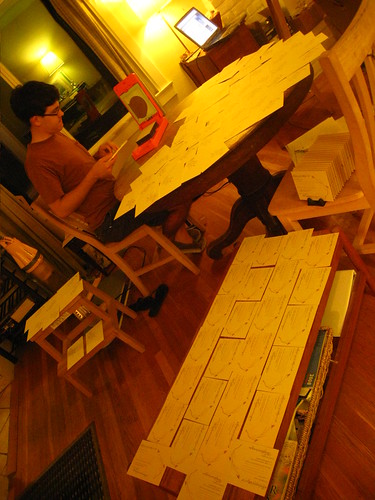
Our invites were entirely designed and created by little ol' me (using purchased art...I'm not an artist!). P. bought me a gocco for my birthday so the invites were really my first project using the gocco. I highly recommend practicing a bit more before you create your invites. The gocco isn't hard to use once you get the hang of it, but we burned through several frames and lots o' ink before we figured out how to burn the screens to create clean, crisp pictures on the other side.
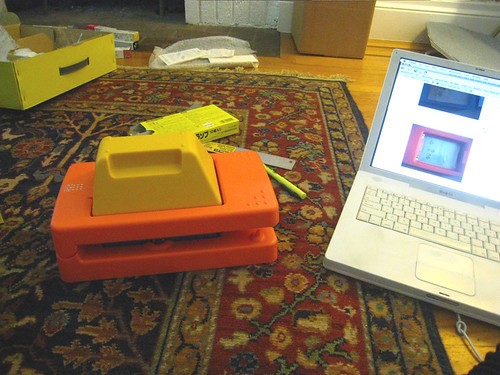 Gocco, straight out of the box, with computer tutorial.

Our invites were entirely designed and created by little ol' me (using purchased art...I'm not an artist!). P. bought me a gocco for my birthday so the invites were really my first project using the gocco. I highly recommend practicing a bit more before you create your invites. The gocco isn't hard to use once you get the hang of it, but we burned through several frames and lots o' ink before we figured out how to burn the screens to create clean, crisp pictures on the other side.
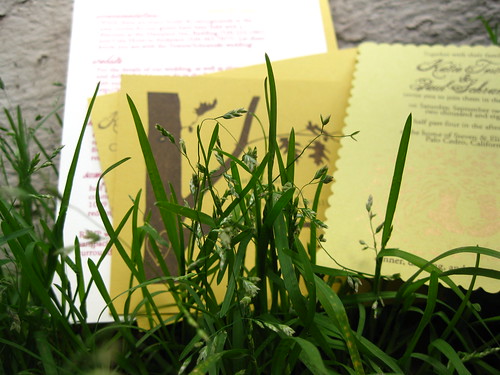
Gocco, straight out of the box, with computer tutorial.There were papers everywhere. Everywhere.
Our invitations had four components. The actual invite, the response card, an info sheet, and the envelope.
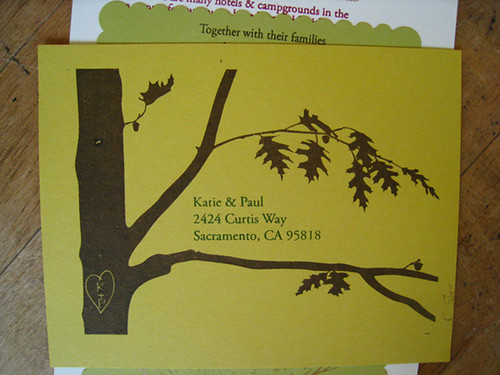
 This image is probably the closest to the actual color of the paper (which came from Paper Source). For the envelope I handwrote a screen using the gocco pen and then printed them so we wouldn't have to handwrite a return address on each envelope. As a sidenote, we no longer live at that address so good luck stalking me there :)
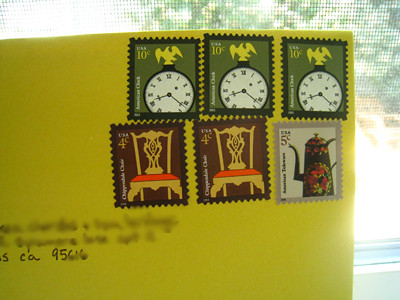 While I wanted to use vintage stamps, that ended up being a cost that I couldn't justify. My way of getting around using the flag stamps (the only stamps available when I was sending out invites), was to use a variety of smaller amount stamps. This involved running around to four post offices who looked at me like I was a crazy person for buying hundreds of 5cent stamps.
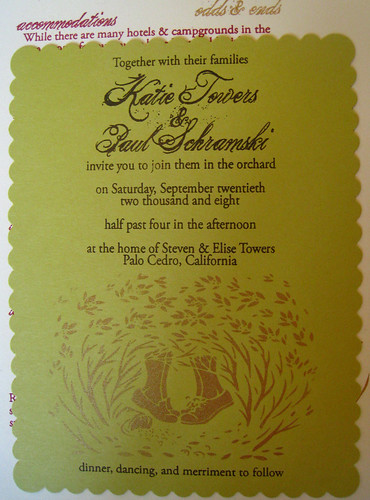 Our invitations were simple, using an image from Nikki McClure, one of my absolute favorite artists. The text is in a dark brown color, with gold ink for the image.
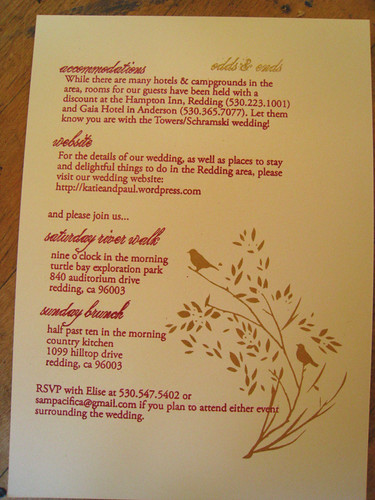 Our info cards used two screens: one for the image done in gold ink and another for the text, done in a raspberry color. We intended to have driving directions on the back of this sheet, but for some reason could not get the screen to print clearly so after several ruined screens we just scrapped the idea and stuck directions on the website.
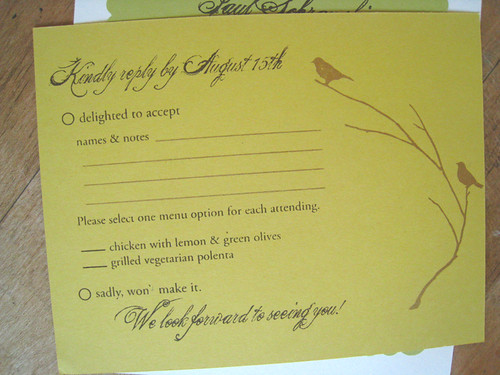 You may notice that on our reply card we didn't really make it clear that people should still write their name if they weren't planning on attending. Several people responded with "no" responses and no names. We had to guess based on postage and process of elimination who those people were. Kind of a pain.
 So all in all I really liked how they turned out. They aren't professional. They aren't letter pressed. But they were fairly cheap. For save the dates, all the gocco supplies, paper, and stamps we spent a total of $310.
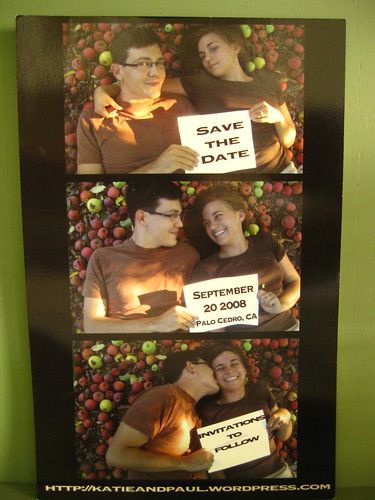
And, since I'm sure someone will ask, here is our save the date. We made my sister take the pictures of us lying under my parent's apple trees holding blank pieces of paper, but wouldn't tell her why. She thought we were crazy. I added in the text after the fact. We printed them using VistaPrint, with a discount code, and I think we paid around $15 total.
Thanks for all the questions! Keep them coming!
This image is probably the closest to the actual color of the paper (which came from Paper Source). For the envelope I handwrote a screen using the gocco pen and then printed them so we wouldn't have to handwrite a return address on each envelope. As a sidenote, we no longer live at that address so good luck stalking me there :)While I wanted to use vintage stamps, that ended up being a cost that I couldn't justify. My way of getting around using the flag stamps (the only stamps available when I was sending out invites), was to use a variety of smaller amount stamps. This involved running around to four post offices who looked at me like I was a crazy person for buying hundreds of 5cent stamps.Our invitations were simple, using an image from Nikki McClure, one of my absolute favorite artists. The text is in a dark brown color, with gold ink for the image.Our info cards used two screens: one for the image done in gold ink and another for the text, done in a raspberry color. We intended to have driving directions on the back of this sheet, but for some reason could not get the screen to print clearly so after several ruined screens we just scrapped the idea and stuck directions on the website.You may notice that on our reply card we didn't really make it clear that people should still write their name if they weren't planning on attending. Several people responded with "no" responses and no names. We had to guess based on postage and process of elimination who those people were. Kind of a pain.So all in all I really liked how they turned out. They aren't professional. They aren't letter pressed. But they were fairly cheap. For save the dates, all the gocco supplies, paper, and stamps we spent a total of $310.And, since I'm sure someone will ask, here is our save the date. We made my sister take the pictures of us lying under my parent's apple trees holding blank pieces of paper, but wouldn't tell her why. She thought we were crazy. I added in the text after the fact. We printed them using VistaPrint, with a discount code, and I think we paid around $15 total.
Thanks for all the questions! Keep them coming!
Subscribe to:
Posts (Atom)